right now

right now
Showing posts with label living small. Show all posts

Nov 29, 2011

Sewing/Crafting Space - when you have NO space!

Just one year ago on Halloween, I sat down to an old, broken sewing machine, and decided to learn to sew...

This was my setup then, kids' old computer desk with a folding table and the rolling cart the kids used to keep their Legos in!  It "worked" but, was very shaky, and nobody could get to the back door!  Oh and let's talk about the fact that the "cart" was missing a wheel, so it would randomly just decide to flip over and spew it's contents all over the floor :)


Most of you seasoned sewers/crafters will understand and be nodding your heads furiously when I say that my newfound love of "sewing" quickly morphed into the desire for organization!  Things started reproducing at an alarming rate: thread, fabric, grid rulers, miscellaneous paraphernalia strewn about like beer bottles in a frat house.  By now most of you know the horror that strikes in me - now over the past 8 months add all my knitting and now scrapbooking junk into the equation... this was definitely one of the worst hobbies a Type A/OCD girl could take up in a home with 950 sq ft!  Hubby would get home from work, trip over a sewing machine cord strewn across the living room right in front of the door, be forced to sleep on the couch because I have quilt pieces laid out on the bed for placement (don't move those!), he even started using my ironing board as a kitchen island it had been there so long!  

What's a guy to do?  Well for starters, I had a cart that had an open top used to store appliances.  He made me a wooden top for it and I made panels to hang on it and cover up.... all my fabric storage!  Yep, this thing actually looks like a kitchen island now -


Below is a peek behind the curtain:  I have yet another old Lego bin I stole from the boys and labeled it for different size precuts and scraps, I buy those big 12x12 clear scrapbook page storage envelopes (with the 50% off coupons, of course) and use them to store fabric in, a repurposed open bin for stuff I'm currently working on, and an old box full of, eeeek - old sewing machine parts.  Yes, I am amassing quite a little collection of estate/thrift machines, it's a sickness I will write about another day :)


Nowadays, however, it parks conveniently between a door and my desk and I topped it with my favorite inspirational things and instead of looking at stacks of fabric all over (remember I have no closets in our open plan house!), now I have a cool little retro groovy fabric corner that rolls anywhere I need it to! Well, I like it anyways :)


But this little gem below is what makes it ALL work... enter the "Go-Go-Gadget, Craftroom"!

A very small footprint with a big storage shelf, huge and deep drawers, and wheels!  We all know how much this house needs wheels!  Here she is folded down and parked just about anywhere:


And here she is all folded out - takes only about 20 seconds to fold it out, and if you were so inclined, there's room for 4 crafty people to set up!  You can even store 1 or 2 machines on the bottom so it's always there.  It's awesome for cutting patterns on and don't even get me started on how handy this is to serve a buffet on...  


I really wanted to see how it held up to abuse before recommending it, but I've been using it since February and just love it.  It sees lots of abuse here too, since I can't leave it set up so it gets rolled around the house and folded and unfolded every time I sew - no problems.  It fits one of those big folding cardboard grid things on the top, so that helps with pinning and cutting so I don't mark up the table.


I won't bore some of you with repeat photos, so check out my post on the "Crafty Hallway" to see how I got a ton of storage out of my hallway, great as long as you aren't 5 feet wide, I guess, because then it would cease to function as a hallway :)

Anyway, that hallway is there by the blue curtain covering up my washer/dryer, so it's easy to grab the supplies I need.


 Besides the actual folding table, the only things I have purchased for the "space" were the carousel I mentioned the other day I got for 80% off, and this light below.  I saved a TON by buying this adjustable light for $19.99 the last time I was at IKEA, when I saw how much those crafting lights were I almost fell over and after using this cheap one for 8 months now, I can't imagine that there's anything the spendy ones could do for me that this can't, I love this light.

So here it is today - it's pouring outside so I set it up and am going to sew.  If hubby needs to get into the bedroom though, he's going to have to crawl under the table, he's used to it!  Just kidding, there's another door to the bedroom off the hallway :)


So in the span of less than a year, I'm basically a lost cause.

And oh, yeah... Santa can find this table here.  If you watch you might find a sale, I got mine in Feb for $179.99 with 10% off that price with a coupon code and free shipping. No, I'm not getting anything for the review, I just like to help others with the same lack of space issue as I have!  

So now show me yours!  I'm still jealous as can be of those of you that have a room for crafting (we know who I'm talking about!) but that sure doesn't stop me from wanting to see!  Someday, someday... :)

*note - it's BIG, measuring 36" x 76" and if you have carpet, you would probably need to leave this in one spot because I'm pretty sure it won't roll on that! - Also note that it is a counter height table (which I happen to love), so you will need to find a bar stool/chair that has a nice place to rest your feet so it's comfortable.



Jul 22, 2011

The relatives are coming!

Tomorrow.  Where the heck are they going to sleep?  I guess this could qualify as another in my "Living Small" series, where do you put an extra bed in a 900 sq ft place with only 2 bedrooms?  If you haven't gathered this by now, I love a good space challenge, I live for this stuff!


Go, go, gadget...bed!  


We are the new owners of what I call the "Gadget Bed"!  This is a queen size airbed by Ozark Trail that is actually on a collapsible frame, which is great for a travel/camping bed that actually doubles as a real looking guest bed, and you can make the bed without using any kind of special sheets or anything.  When you are done, the whole thing collapses down to a wheeled travel bag, so you really can take it camping or wherever.  You can see it here, it's hard to find in stock online, making me think they might be discontinued but we found it locally in a Walmart store.  I see Cabela's also sells the frame separately if you already have a mattress.  This folds up in less than a minute!

Travel Bag (it's about the size of a large duffel bag and will easily fit into a closet or under a bed)


I don't generally devote loads of time into reviewing products, but when I come across something that I really need and it does the job, is multi-purpose and stows away neatly, I feel a duty to share with anyone else that lives like they are underway on a sailboat!

I slept on it last week to try it out and it was pretty nice.  I'm not sure if that's because the bed was that good or if it was because I had the whole bed to myself without hubby and the CPAP monster mask/machine next to me :)

The surface of the bed is the wavy type air mattress with a zippered cover, so the only thing I would recommend is that if you were using this for an extended period I would recommend splurging for a quilted mattress cover that would be more bed-like.  Lucky for me, brother and sis-in law are avid outdoor people that camp and hike and I think will be fine.  Ha, are you listening L?  You'll be fine..... :)

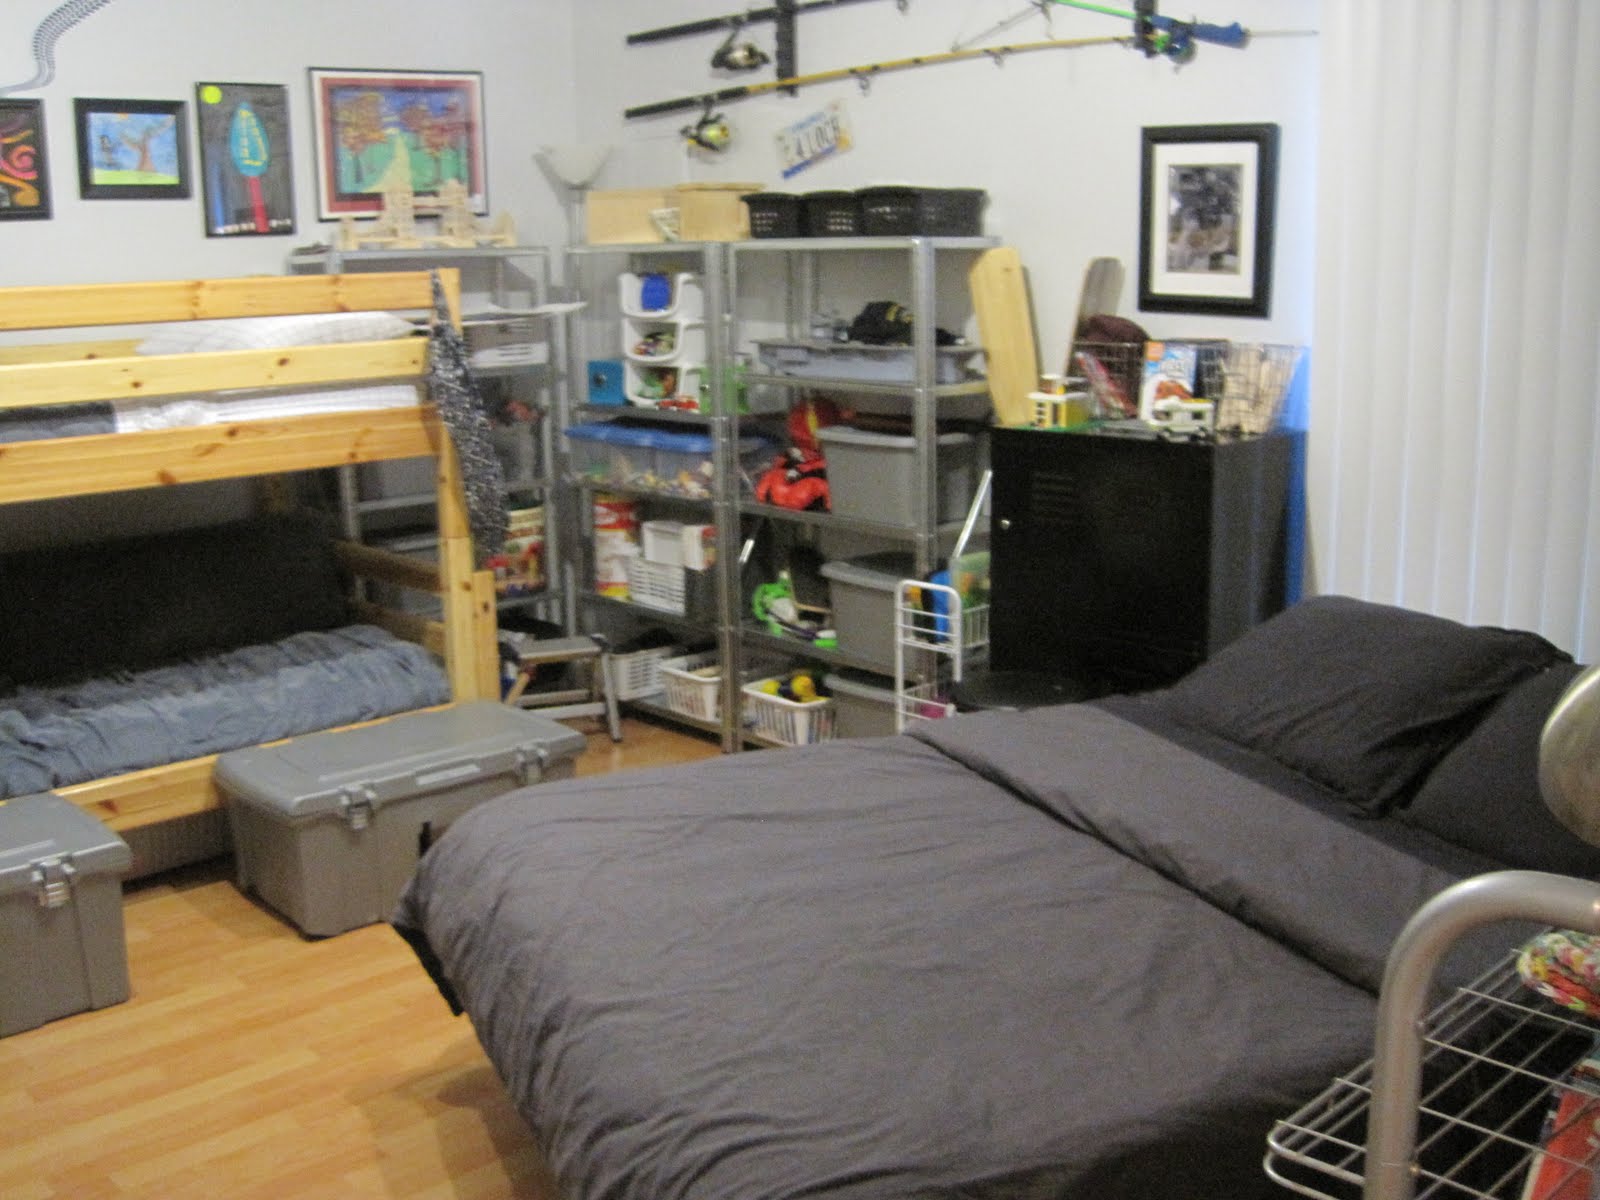
Here it is all made up, tucked into the corner of the boys' room


So.....

If you don't mind bunking with Thing 1 and Thing 2,
come visit - we have room for you!

If you know me at all, now you know I'm not crazy when I say that I'm thinking that I should keep that room as a family "bunkroom" and turn the below bedroom into one big ol' quilting studio! The house would be one big kitchen and quilting space, haha!  


Can't you just see cubbies lining the walls and a big quilting island table back there?  Sleep is highly overrated, anyways.  I swear, it's really not the heat that is making me have crazy ideas!

I wish we had a group of dysfunctional family members thrust together in this tiny space because that's just plain fun blog-fodder and a good social experiment, but the truth is that the kids' Aunt Lauren & Uncle Mikey are just plain fantastic people, easy to please and fun.  There won't be any good dysfunction to write about LOL.  Although maybe they are a little crazy to leave the dry heat of Phoenix for our Amazonian rain forest 110ยบ in July!


Not sure how much I'll blog the next few days, I'm a bad multi-tasker when it comes to vacation time, either mine or someone else's!


Mar 23, 2011

Living Small - Update #3 The Kids' Room

I found the photos!  I finished the kids' room last week - for the most part.  Some of you might think I'm crazy for getting rid of the kids' IKEA storage bins, and yes, they were nice - but I believe in selling stuff while I can still get some money out of it, and I had a set that literally lined every wall in the room, and it was just too much stuff.  I also took apart the bunk beds since those aren't selling on Craigslist, and used them as twin beds.  Yes, it takes up more floor space, but now I can actually make the beds, and they really seem to like the new setup, it's a little more "big boy".  The nice thing is that I can easily put them back into bunks if necessary.


I'll warn you that it looks a little institutional in all gray LOL, but the idea is to bring back color into their room through fabric which I can easily change at whim, instead of becoming sick of colored bins and furniture, does that make any sense?


Believe it or not there's a theme, here - what's the one really important "room" that we don't have here at our house?  A GARAGE!  So now, the kids' room is a "garage".  I styled it that way so the bikes and outdoor gear we have to stow in the open anyways is now an integral part of their decor, and as a bonus the furniture is cheaper that way!


Here's the before, during and after:


Before, the bins I sold - they were awesome, but they were everywhere!


Before, bunks


Painting


Below, all furniture moved out except beds, which were broken down into twins just for a change

 here's where it looks like a juvenile detention facility in monotone :)

One of the things that helps space and save money is that none of us in the house have dressers, we use the closet to the utmost!  They used to keep their clothes in some of the former bins that were sold, but I purchased these drawer carts for each of them and they stow right in the closet.  I figure if the clothes start overflowing these, it's probably time to purge.


Drawer storage bins - $40


Next I framed some of their own artwork to bring some color and their personalites in.  I store just a few things they have brought home or done at home over the years, so this freed up space in my closet!

 Frames - $0 (they were reused from other old photos and things I no longer wanted framed and hung)

Wire rack bookshelf/nightstand and bedside lamp - $30


Here's where things get really "garage-y"!  After tossing and donating many toys they no longer use or need, we were down to a very manageable amount that would fit along one short wall on these very inexpensive ($19 each)metal garage racks.  Combined with some extra bins to contain small things like Legos, building sets, etc, it makes for a nice area that's easy to keep clean, as well as portable.  If they want to play Legos or something in another room, they can just bring the whole bin with them.  We already had the fishing rod rack, it was stored in my craft area LOL, so this is a MUCH better place for them!

metal racks -$57
storage bins (some we had already) - $36


In the above photo, I can't get a good shot of the open space thanks to my massive seed starting contraption that's in the way, but they have a drafting table that can seat one on each side when it's folded down level, with a art storage cart repurposed from my old yarn storage.  They already had this, but it was kind of stuck in a corner, now it's easily accessible from both sides, near the sunny sliding glass door and they are playing Legos or drawing and painting every day there.

Below, I can't seem to get around that darn seed/light setup, but they each have a cool footlocker ($22 each) at the foot of each bed they can store their "own" things.  They are already begging for locks, haha, Finn wants to lock up his precious rock collection and Loch is convinced somebody might take his duck calls :)  Ah, to only have to worry about these things, eh?  Must be nice :)
Footlockers - $44


There is quite a bit of open floor playspace in front of the beds, I just can't seem to capture it here.

For obvious reasons, I haven't had time to even dream up quilt designs for them yet, but I intend to get some more color in there with quilts and a couple of funky fabric panels I will attach to a few random shelves on the metal shelving unit.  Of course Finn wants a black and white "skull" quilt, and Loch wants "chess"...  I need to have a talk with them about color!

Remember how everything in this house has to have 2 purposes?  HA!  When the kids leave home now we already have all the stuff we need for our future garage :)  That's kind of the idea here, to not spend money on decorating that is only specific to this house - not only are we military and the living situation could change at whim, but we are also starting to prepare for leaving the military in a few years.  We want to be able to have things we can easily repurpose for any room in the house as we do not know what type of home we will have. Will it be a farmhouse?  A cabin?  A yurt?  Who knows, but all this stuff can easily go from kitchen to bedroom to basement or garage and we will have lower expenditures on furniture when we really need "low", i.e. no more government paycheck LOL.

Project Totals
                    Week 3: - $207   (kids' room - storage, accessories)
Week 2:  -$146  (furniture, accessories)
   Week 1:  -$196  (paint, painting supplies)
Sold via Craigslist:        +$275  (sold kids' IKEA storage bins)
*net spent on house refreshing to date:  $274.00


Mar 15, 2011

Living "Small" - Update #2

Whew... I just finished catching up on everyone's blogs I missed the past few days, y'all are busy!  Busy here as well, here's the update on what got accomplished the past week:

that's me, still painting!


I am trying to do a really "good" job, painting all the trim and everything, now if that darned housing market turns (yeah, right...) we'll be ready!


This past week I actually made a few purchases for myself and the house, but first I sold stuff on Craigslist, storage bins from the kids' room - sold for $275... in one hour!


Some of you may remember that I don't wear jewelry, at all, so imagine how surprised I was that I actually liked this ring I saw in an antique/junk store!  I'm sure it's not valuable but I just happen to like it, and after talking them down to $9, I bought it!  Since I am now sewing, I just wanted something pretty to look at while pushing and cutting fabric - sounds loony, I know, but hey - it makes me smile :)


I decided to wear the ring over to another antique (mostly junk LOL) store and lookie what I found!  The  "50's Ford pickup truck" of sewing machines!  I was starting to think the ring was my shopping good luck charm.


Had to have it!

I talked them down from $98 to $65, didn't even care if it worked!  Once again, it just makes me happy to look at it!  I liked it so much in fact, that I created a little "inspiration corner" next to my desk where I can look at it and get inspired retro-style to make things!  It is sitting on the cart that I made the panels for to store all my fabric.  Upon further research, it appears to be a 1961-1964 made machine, how "mod" - I'm loving that since mid century "stuff" is my favorite.


Hubby got home from work, laughed at it, then proceeded to sew on it - it works!  Now he's pretty excited to get it all cleaned and shined up, just like that old pickup truck that he's always wanted...
- it may be my favorite thing ever!


Speaking of Mid-Century Modern, although it is my favorite design period I have rarely been able to obtain any of it due the high price of reproductions and complete unavailability and cost of the actual thing, until now....


Found at the Salvation Army the other day...  (I was wearing the ring again!)


I almost passed it by, since there was an ugly blanket draped over it with old china stacked on it, I think that's the reason it was still there, nobody had noticed it!  It needs a bit of cleaning and strengthening on the bottom, but has solid wood drawers and is just plain "me".... $60

Again, it makes me deliriously happy to look at it!  I'm done with having anything in my house that I don't absolutely love... life's too short to store stupid $hit!  (hey, that may be my new motto!)


Still wearing the ring, I headed to another antique store, where I found this train case - 


Ever since I was little I have loved these, they just seemed to always exude romance and adventure!  This one was in beautiful shape, a Samsonite covered in leather from the 60's, and the latches and key work.  I put it in my sewing/craft hallway and it now is perfect for holding my patterns...


$12

I can already see that my "someday" dream sewing room will definitely be a Holly Golightly inspired space, full of retro funky finds that inspire me and make me happy, it's my space after all!

About the "end of the hallway" - hubby built these shelves in to an otherwise unusable area of the hallway years ago.  The space is only about 6-7 inches deep so I couldn't even keep a standard bookshelf or side table there.  Now I am able to store my machines, (yikes I'm up to 3 working machines now thanks to hubby working on them!), magazines, crafting books and a basket that holds my library books.  It's also perfect for displaying a few photographs or other "favorite things".  Just sayin', there's space everywhere if you just look!


I took the day off reorganizing yesterday to sew my first paper pattern!  I know I'm psycho, who quilts before they learn how to sew?  I was SCARED!  Looked like rocket science to me.  I did it, but the v-neck on the jammies was horrible and they are a bit big, Finn looks like a tree stump in them but he is overjoyed that I made them in the fabric he got to pick out himself.  Go ahead and have a laugh at my expense :)

someone give that kid a haircut!
 (a job for the intern...)

I am almost finished putting the kids' room back together so that will be my next update, I didn't want to overwhelm you with all these photos.

One really good thing happened this week, I cleared a path to the kitchen to cook last night!

Standard freezer busting stir-fry, look at all of last summer's stuff in there - have to make room in there, spring is coming fast.


This Week's Purchases:  -$146  (furniture, accessories)
Last Week's Purchases:  -$196  (paint, painting supplies)
Sold via Craigslist:        +$275  (sold kids' IKEA storage bins)


*net spent on house refreshing to date:  $67.00


I think the ring is definitely going on my finger whenever I go shopping for bargains!

Mar 7, 2011

Living Small - Update #1

I am currently drowning in paint and it feels like we are just moving in!  All the stuff has been pushed out of the living room into the bedroom, then vice versa - we could barely walk in here this past weekend.  Things are moving a little more slowly than I would like, but I do have other things to tend to, like children... 
Oh, paint is expensive!  This isn't even all I will need.
5 gal "Ultra Pure White" satin:  $115
2 gal "Sterling" satin paint+primer in one:  $32 each
misc supplies:  $17

Total this week:  $196


Luckily, I don't need to tape off when I cut in (yeah, I'm that good LOL) so that saves a bunch of money.  I did make a big wasteful mistake, however.  I planned on painting the entire house Ultra Pure White to open up the space and have 2 accent walls in the pale gray.  After painting the entire living room white I then painted the accent wall and fell so completely in love with the way it showed off the white trim that I had to repaint the whole thing!  I'm still doing all the ceilings in white to raise them visually, so all is not lost, I will still need the 5 gal, I just hadn't planned on buying it all at one time.  I found I just couldn't go without color - even though my version of color isn't really a color at all - my favorite color is gray and any shade of it ranging from pale to a stormy blue-gray.  The blue is out though, I really needed BRIGHT!

Below:  "before" colors:  I liked them, but needed brighter


In the photo above, the Nordic blue on the walls really looks light to begin with, and I thought so for years, until I put the Sterling Gray up - below you can tell the difference on the ceiling!  It really gives the impression that the ceiling is further above you than it is (our ceilings are 9 ft).


below, the living room is finished, but not re-assembled yet


Party Foul!


I'm not sure who, but either Marley or Sprocket threw their ball into the paint!  They thought paintball was the next new sport, I guess.

The bedroom was painted too, but everything is still in massive disarray.  I spackled & patched every single nail hole everywhere and now I hesitate to commit to new placement of artwork and photgraphs, I think I'll wait until I get a huge "whole house pile" of wall decor, then redistribute it into different places and throw things out that I don't absolutely love anymore.  That's the best way to stick to budget I've found, just not buy anything decor-wise until you've had the chance to try out the old stuff in new places!

So... I'm a couple steps closer to finding my sewing nook, just like this gal...  okay, maybe I don't resemble her all that much.  


 Remember, that's what started all this nonsense, I need a place to channel my inner domestic diva!