right now

right now

Jan 28, 2011

my test kitchen results!

Some of you may know that while I love to "cook", am pretty decent at it and never use recipes, I CAN'T BAKE worth a darn!  Sure, I can follow recipes for cakes and cookies, etc and have acceptable results but at the very core I have never understood how baking ingredients work together and cannot veer away from a recipe when it comes to doughs or pastry crusts.  I really envy those of you who can.


Well, I've done it!  The following recipe has been tweaked for about a year in order to get all the ingredients I wanted in there, specifically incorporating soy, flax, wheat germ and oats while subtracting basic white flour down to the bare minimum that still works in a cookie.  It was loosely based on my mom's wheat germ choc chip cookies she has made forever, yum!  


Welcome to my new, relatively healthy (there's still butter & sugar in there) cookie recipe.  I need a name, I'm thinking "Hippie Cookies" since there's a lot of good stuff in there, hubby loves them and he's from Oregon, and well - you know those Oregonians......  :)


If any of you decide to make these be forewarned that they have a definite nutty flax taste to them so if you don't like that you can omit it and replace with the same amount of wheat germ or oats.  Most of the sweet tooth craving is gained by the dark chocolate chips.  They stay chewy and freeze well also.


Guiltless Hippie Cookies
Ingredients
1/2 c. soft butter
1/2 c. brown sugar
1/2 c. sugar
2 eggs
1 1/2 tsp vanilla
1 1/2 tsp baking powder
1/2 tsp salt
3/4 c. regular flour
1/4 c. soy flour  (I was able to get an extra 1/4 c. in there for a total of 1/2 c. but wait til the end to see if your dough ball is moist enough to allow you to get away with it)
1/2 c. oats
1/3 c. flax
3/4 c. dark chocolate chips

Instructions:
1.  mix butter & sugars to cream consistency
2.  add egg & vanilla and mix into sugars
3.  mix in wheat germ, baking powder, flours, salt
4.  stir in oats & dark chocolate chips
5.  drop by spoonful onto cookie sheet and bake 350ยบ approx 15 mins (my oven is electric so adjust as needed)
* makes 3 dozen cookies

I would have loved to not use any white flour but a certain ratio has to be met so they will rise and "cookie up", for lack of a better phrase!  If any of you super bakers can improve on it, let me know - but these are delicious, not too sweet, and perfect for satisfying a sweet tooth without guilt.  There also a heck of a lot better for kids' lunches than those pre-packaged sweet things some kids take to school!


Jan 27, 2011

Look ma, * TWO * hands!

And then one day it clicked...!  Finn has started playing piano with both hands, it was an exciting night to be a mom :)


(he wasn't too happy about me wanting to record him, but I'll take it!)


Stock has been strained and put into freezer containers, throughout the whole event I had bystanders...


Marley is so intent here it appears she has no ears!  This is the herding look she gets when going in for an ankle bite LOL.


They know a special plate is just for them:


Not to be eaten in one session of course!  I used to work in a veterinary hospital so I've seen what can happen there!  I already know that marrow is too rich for Marley's stomach, so I separate that from the actual meat bits and carrots and plain soup bones, which are very safe for them to chew on.  They will have a little topping of meaty bits and carrots with dinner each night this weekend, and I'll pop the bones right back into the freezer to be issued to "good dogs" at a later date.  We try to use everything about the lovely animal we bought our beef share from, right to the very end literally, since this was the last of our share until the next one is finished out on pasture this spring.  (There is no forced timetable for pastured meat, they get to butcher weight in their own sweet time unlike their factory farmed friends forced to eat corn, huge amounts and quickly... oh sorry, there's the rant again!)

Of course, we had to have a "good dog" moment right away tonight!


It's a good house to be a dog in!

Jan 26, 2011

Still no seeds...but lots of stock!

Seeds haven't arrived yet, hubby has taken to yelling "mailman's here!" daily when he sees her stop.  He's home during the day now since he's working nights and I'll admit it's hard to get things done now while trying to be quiet while he's sleeping in the mornings.  I tend to work in the evenings these days.  Funny how his schedule affects the whole household that way.


Last night I dove into the blog, changing things up a bit.  I'm a person who rearranges furniture monthly so I'm not sure why I haven't revamped the page in awhile, but it needed a spring cleaning, and it certainly is helping to inspire me in other ways.  This time of year can be kind of monotonous without much (nothing!) going on out in the garden.  I put a few links in to albums of things we grow and cook from the garden, hoping that will inspire me to get creative in the kitchen during the dreary months of winter and be able to add to it.


Today I'm making beef stock.  I've been putting it off since the soup bones were at the bottom of the freezer, and sure enough, getting them out spurred another freezer cleaning adventure, as everything came tumbling out while digging to the bottom!  Nothing like getting hit on the head by some venison burgers to wake you up at 7 am!

Used up the rest of the batch of soup bones from the farm, a few come with my beef share, but I always pick up extras from the barn freezers when I go, at a buck a pack you can't go wrong!  They have smaller ones packed together especially for the dogs, but Marley got sick from eating the marrow with her sensitive stomach so now I just give her one from the soup pot after it's all been cooked out.  Sprocket doesn't seem to mind a bit.  I'll take them all from the pot tonight and freeze them for the girls.  This is the first time I have owned dogs that can chew bones together socially without any growling drama, it's pretty nice!

I used up the rest of the dried herb stalks I had hung, I definitely need to do more next year.


When the kids got home from school and walked in they both said how good the house smelled and asked what was cooking - when I told them it was beef stock to make soup with tomorrow they grumbled and asked if I was going to muck it up with veggies and greens again, sigh...  They haven't quite made the connection yet that those veggies in the pot already were what was half the yummy smell, I'm anxiously awaiting the day where they stop grumbling about all this good stuff!


Plans tonight:  straining stock and freezing it, setting aside some for the soup I'll make tomorrow, and thinking about reading a book!  I haven't indulged in my love of fiction lately, no doubt as soon as I get into it, those seeds will show up!

Jan 25, 2011

a "Plan B" kind of day

Plan A was to finish my first quilt before my seeds arrive and I have to start getting things in place for seedlings.  That plan was pretty much taken away from me last night and again today.

Sunday night:  quilt top was laid out and basted together to be quilted, this went well.


Monday:  started quilting, I thought everything was going okay, I got to last couple rows of vertical grid quilting when the machine started kicking and bucking and basically self destructing.  


For the next hour, I was able to limp it along by just leaving the cover off and tightening the belt and disassembling and reassembling the stop motion knob every 2 minutes before it went down in blaze of glory screaming "nicht mehr, genug!"


Today I begged hubby to look at it and the diagnosis wasn't good.  No, he isn't a sewing machine technician but he IS a mechanic by trade and this is a basic mechanical machine.  Looks as if it's more than just a new belt needed, the clutch is hosed and quite possibly a broken motor mount.  DONE.  It will be 2 weeks before I can get a new machine, some tax refund funds have been earmarked for that, so in the meantime I had to put away my first quilt sadly.  I can't believe my first project is a UFO!


With all the fun sucked out of the morning, I decided to get some things done before the little ones (seeds!) arrive.  I cleaned out my "canning closet".  It will be nice when the time comes to be able to find everything and have the boxes ready for storing since we've been using our canned stuff and as the jars get cleaned I've been just shoving them willy nilly back in there!  I was able to separate the lids too so I know which have been used for actual canning and recycle them for just freezer use this season and know exactly where the "new" lids are.  
Before:  mess!


After: it's small, but better than a mess!


some of you may have seen my poster last year, but it's right opposite the canning closet so it reminded me today of just how close seed starting time is.


I will not be starting seeds as early this year.  Last year I had to start seeds in batches since I grow them for the Master Gardener Plant Sale as well and don't have that much room.  I noticed through this process that the smaller ones started very late got planted alongside the tomatoes I had started the last week in January and not only did they catch up in growth in a week outside in the beds, they turned out to be healthier plants for me!  Live and learn... and I just bought myself a couple extra weeks of time!


I guess without a sewing machine I'll just be straightening things out all week and waiting for that tax refund, LOL!  I also have to replace all the closet doors in our rental unit and clean, our new tenant moves in soon.  Hubby is working nights now, he never gets to see the kids but I'm finding I get more done in the evening now than usual!  Thinking about putting the kids to bed and working on the blog a bit, I still haven't tallied up my harvest from last year for a total.  Luckily I don't have any "big messes" to deal with right now, but lots of little random messes - if you visit the blog and it looks all wonky tonight, that means I got motivated to tackle it!  First warm day in the garden watch out... now out there... that's a big mess!

Jan 23, 2011

Learning a new skill...

I finally got around to it!  My previous 2 forays into the sewing world were post #1 where I tried to clean and make peace with a 20 year old machine with a little whiskey for courage, and #2 where I did my first project of Christmas gift bags.  Other than that, I knew nothing other than the basic how-to on sewing a straight line.  I've put this off until I could have an organized area to learn in, and knocked out a few other things on my "to-do" list that had more priority.  Yesterday was my chance...

Why quilting?  Why not? I have always loved the look of the 30's & 40's style quilts but do not decorate that way in my house.  I am a huge fan of mid-century modern and scandinavian style and it occurred to me (lightbulb!) that a quilt can by any style I want, not just country or folk.  (Which I do love, by the way!)  The creativity here is the hook!  

I am normally a fan of getting used or library books, but for my first foray into this world, I used a gift card and splurged on a new, nice spiral bound "Quilting 101" type book.  It has the latest basic techniques and takes you step-by-step through 4 basic beginner style quilts.  I tend to want to "do it all" right away, but I know with my low patience level I needed to start small and figure out the basics.


The biggest challenge was figuring out what to do with all this "stuff" I had purchased, meaning all the cutting and measuring, oops probably not in that order :)  By the 2nd set of squares I was getting the hang of it.  For those of you put off by the "random and abstract" concept of knitting, this is the complete opposite I've found.  It's all math and geometry and it's easy to visualize the final product during the process.  Loch my little math whiz was pretty interested in this part of it.  I want to thank Mama Pea & APG for telling me the basic sizes of cutting mat and grid ruler I would need, you were exactly right - they worked for everything I needed without having to spend extra $$ on stuff I wasn't familiar with yet, and for any newbies, these supplies aren't cheap - use coupons and use the sales for everything, they usually go on sale every other week at a fabric store, and if you have a local Craigslist, check there since this seems like one of those things where people with lots of $$ buy everything and never do it so they sell it, kind of like a treadmill, hahaha!


For my first quilt, I channeled my inner Marsha Brady and went for a nice retro floral print and peach, and the border and binding chose a dark fabric to hide my beginner stitchery!


 Here's the blocks after cutting, just laid out into the pattern that will be the quilt top.  This is a basic style called a "single patch" quilt.  Already at this stage my head was spinning with possibilities of adding other colors and shapes, I had to remind myself to slow down and start easy with something I won't end up in tears over.  If you want to see tears and have a laugh at my expense, see the post of my first time learning to knit :)


This was the not-fun part, but only because of my machine.  Hubby saw that I was ready to sew on that thing and disappeared to a buddy's house to go build "an obstacle course" for their mountain bikes.  Even the kids disappeared into their room!  I had to disassemble the shuttle 15 times to dig thread out, had to completely remove the stop-motion knob in order to wind a bobbin, and Mama Pea, check out your pink duct tape!  I had to use that as a 1/4" guide since my machine has no markings smaller than 5/8"!  But all in all, the machine DID sew the quilt top, and my sanity is still intact.


Above, after sewing the squares into strips... so that's how they do it, I didn't even know that!  Below, the finished quilt top:


Today I will move on to the next lessons on the actual border, quilting, backing and binding...


The reason I was able to get this all done yesterday is that I finally got my seed order put in Friday evening and was able to tackle and do our taxes yesterday morning, the two big things that have been weighing on my mind.


Taxes already, you say?  You betcha, thanks to hubby being deployed for the past year in a combat zone, our taxable income according to the government indicates we should be living in a cardboard box under the freeway - so that means refund time!  I don't waste time when it comes to getting money, and after some bills are paid, I'm hoping to stimulate the economy by getting a new sewing machine!

Jan 21, 2011

How do YOU store your seeds?

It's time!  I'm working on my seed order today, and I'm doing one more check of "The Binder" to see where I can save some $$.  I swore this year I was cutting down on how much I spent on seeds because you see.... I have PLENTY already!  What is THE BINDER, you ask?  It contains everything that has to do with my garden, all in once place.  I know there are better ways to store seed for long-term, but honestly I've been using The Binder for 3 years now with no ill effects on germination so far, but I am also good about checking dates on packets, etc, and know which seeds stay viable for how long.  And of course I am going to challenge you to do a post on your seed stash!  For now, here's mine...

This bookshelf sits within arm's reach of the sofa, and has all my garden related stuff so I can surf it whenever I get the urge.  A basket on the floor directly below contains my seed catalog mail.  See The Binder?  It's the big black one with the veggie stuff on the spine. (clipped from the lovely Baker Creek photos of course!)


Here it is again... it's BIG!  It has to be because it contains all my seeds along with other important "stuff".


I have the pages divided roughly by veggies/herbs/flowers, also spots for wildlife gardening, soil, homesteading tips & tricks, fruit, etc...


A look inside...
seed starting schedules, I write the day I should start things, then update it with the actual date, how many, specific culture notes, etc


A chapter for bees and native plantings...


Chapter for birds & wildlife preferences and any other "stuff" I happen to deem worthy of clipping and saving


A spot for "other stuff" which now includes fruit and the brewing garden


A place for those pesky tags you know you might want on fruit trees and perennials - like when I saw my potted citrus covered in fruit but couldn't remember buying it in the first place, much less what it was?  It's a Calamondin!


About 80% of the book is seeds... I use photo pages to keep things neat and orderly, this makes weeding things out that I didn't like or didn't do well a breeze.


Big page pockets hold random large amounts of seed such as all my edamame, peanuts and even innoculant which won't fit in the smaller pockets.


I keep a calendar stuffed in the back which only contains garden stuff on it such as times of day for hardening off, planting dates, and weather.  Below is a shot of April last year, the craziest month for us for everything.  It's always a gamble, but I can refer to last year's weather notes when deciding when to put things out for this year.  Once you have a few of these calendar's worth of notes to refer to, you can ditch the old "recommended dates" and go from experience in your own garden, which I have found really invaluable especially for fall plantings.


I always keep some loose leaf grid paper in the back along with a pencil pouch with colored pencils, rulers, etc so whenever I get the urge I can do a little planning!  I know there are great software programs out there now, but I really enjoy doing it with pencil & paper, it's kind of like a kid's art project for grownups!  Bonus is that I can hand out extra sheets of paper to the kids and they work on their "own plans" and stay quiet and busy while I do mine.

Sooooooo...... how do YOU keep your seeds and stuff together?  Inquiring minds want to know, so please post on it!  Also, don't think for a minute that my seed starting stuff is this organized... it's just thrown willy-nilly into the attic.  I'll photograph that embarrassing mess when it's time to get that stuff down!

Jan 17, 2011

Just when I thought I had reached the peak of stretching space...

Wow, it's been awhile since I've posted - I've thought about it, but honestly I haven't had anything truly interesting to write about.  I've been swallowed up with my "tossing things" in the house phase.  Pretty boring stuff, unless you are me who is overjoyed to see each bag of stuff headed out the door to spaces other than these...


We've been really trying to get back in the groove of hubby being a regular full-time resident of the house now that deployment is over, but it's been hard, but not for the usual reasons of clashing in the house and disturbing the natural order of things, but instead it seems like I communicated with him more when he was on the ship lately!  He has been working 12-14 hour days every day since he's been back, he is gone by the time the kids are up for school, and home just in time to tuck them in at night.  I've been trying really hard to get back to cooking "real meals", but find that I have to just save him a plate to eat when he gets home.  The kids and I always sit down to a family meal, but sometimes the content & originality is lacking when I cook only for 2 little guys.  


The past week I have been trying to use the freezer stash of garden goodies every night from here until Spring so we can get an accurate amount to preserve for next year, since we need to account for hubby being home and eating the harvest too.  I grew less last year, but hubby will eat anything and everything that I can plant so I need to get creative again!


Some of the dinners this week were pretty basic one-dish meals, but all had garden veggies incorporated:

Good 'ol spaghetti & meat sauce, used ground turkey and the canned sauce and stewed tomatoes & frozen beans

Sausage & Frozen Bell Peppers with canned stewed tomatoes & pasta

my favorite usage of freezer stash or fresh:  Stir Fry!


How about the rest of you?  Are you finding you had enough preserved to last til Spring, or will you be increasing the amounts preserved for next year?  I definitely need more tomatoes put up!


Last night was hubby's night to cook, he makes amazing pizzas - I just wish he would clean up his mess afterwards!

 I hope the boys learn his crust recipe, it will serve them well later in life!


On to the only excitement of the week-  I made the long trip up to D.C. to IKEA on Friday to create my "craft space"!  It is very hard to describe the limited space I have in this house, but here's a reality for you to ponder... I only have 4 rooms in this house including the kitchen - and no garage!  Minus the kitchen, it's one room that houses both boys and all their toys, our bedroom that also serves as my office space and garage like storage behind a curtain for all our camping/hiking stuff, a living room that is also the dining room and music room, that leaves..... the hallway!  


FYI:  the below rack behind the bedroom door was my old "stash space"...I can't even really hang door units on the door since they are all french doors to have the place feel bigger than it is.


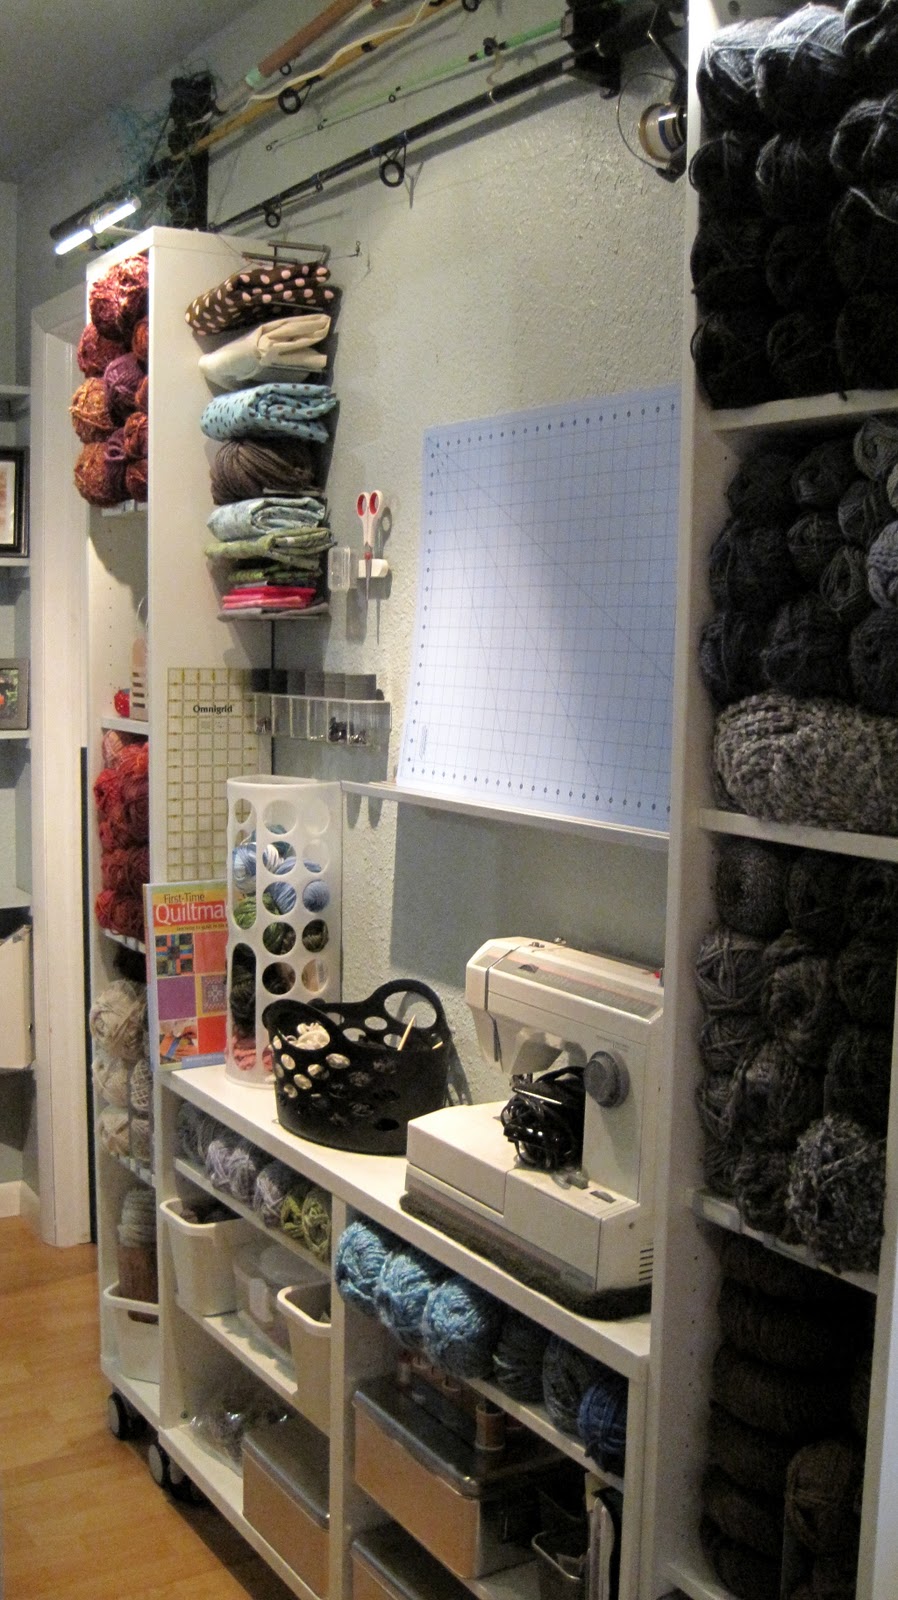
The hallway in the below pic also stores the washer/dryer behind the blue curtain on the left side as well as hubby's fishing gear up near the ceiling, see it LOL?  He used the recess at the end to build me some built in shelves for the few knick knack pictures I have.


Good thing I really love organizing and get a "high" off of being able to fit our lives into this small space.  While I would dearly love to have a permanent table to sew at, this will do pretty well since the dining table is right next to the craft storage area, and all of it is out in plain sight so I will actually be tempted to USE the sewing machine!  (Before I had to dig all this stuff out of underbed containers and trolley carts shoved into a closet).


Below, the big reveal... taking up only about 7-8 sq ft and going vertically, it houses my entire yarn stash, area for my sewing machine, supplies, etc.  Since it was IKEA, I sprung for the shelf lighting to highlight this area to do double duty as "art".  We even have mountain bikes hanging in the house and choose to highlight them rather than hide them.  It amuses a few people but we need to - no garage and hubby actually rides his bikes to work every day, rain or shine so they need to be accessible.  The reason I love IKEA so much is that it's one of the few stores that carry shallow units instead of the standard 11-12 inch deep shelves that would stick out into the hallway too far.  These cubes and shelves are only 7.5 " deep.  Also, if you notice my attic stairs have to pull down here, so I solved that by putting the units on casters and they are secured to the wall at the top with industrial velcro.  When I need to pull down the stairs, I simply wheel away the first unit and they will come down.   I can get away with the velcro because the high shelves are light and only store yarn.  Hubby just shook his head and smiled when I was done, he said it wasn't at all what he pictured from my talking about what I was going to do.  Not sure if that was a compliment or not LOL.


Below, a close up look at the shelves/wall.  I used a baking sheet divider to store random pieces of fabric, magnetic bars to hold things like scissors, tins of pins, etc.  Spice rack holds more notions, a plastic trash bag caddy holds partial skeins of yarn that are destined for a rug or some other small project.  I reused a metal chalkboard tray from the kids' room to hold my cutting mat and smaller felt quilt block design board I made last night (not pictured).  There is even a space the the left of my old machine to park my someday new machine!


I'm pretty darned excited about it all!  BUT.... this week is for ordering seeds, so the sewing will have to wait a bit longer.  We are scheduled to have a whole week of rainy, crummy weather, so it will be perfect for finishing up my seed ordering and bed plans - those catalogs sure bring a bright spot to a dreary day!